I finally worked up the nerve to actually do it. My wife's Cobalt has needed this for a few months--how in the world you need a strut replacement inside of 2 years I'll never know--I ask "what'd you hit?" Oh, nothing, just normal driving... 
I've always been scared away from doing struts by others who seemed to know more than me. But, having done it, it seems easy and safe provided you are using the right tools and are using them correctly. On no uncertain terms though, it can be dangerous. Therefore I am only providing this to tell you how I did this. In no way am I telling anyone to do this, especially if they're not comfortable with this repair. Also note, I am a chemist and am not a lisenced mechanic, so as with all things, consider the source.
Struts are a normal wear suspension item that you fortunately don't have to replace very often—or maybe you do based on your driving habits... This procedure was done on an 07 Chevy Cobalt, but likely applies to almost all vehicles that use MacPherson type struts. Of course, bolt sizes and types often differ.
Start by raising and supporting the front of your vehicle on jackstands—if you are not using impact tools loosen BUT DO NOT REMOVE the lug nuts of the wheel(s) you intend to remove. The photo below shows two points I used on my wife's Cobalt.

Remove the front tire on the side with the strut you intend to change—on the Cobalt it's 19 mm lug nuts.

Now mark the position of the strut as it attaches to the steering knuckle—note you'll find a little bit of with paint or maybe white nail polish will work much better than what I used. You should mark where you see in the photo below and along the sides where the strut attaches.
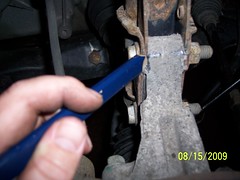
Next remove the nut retaining the sway bar link. On the Cobalt pictured, it's an 18 mm nut. Additionally, on the Cobalt, you'll need to use some sort of liquid wrench on this bolt. Once you break the bolt loose, either pull the sway bar link toward the strut to secure the bolt stud or c-clamp it—it'll make your life much easier on this car, others may vary.

Before going any further, find some way to support the steering knuckle to prevent it from falling any further—you'll note from the photo I did not initially do this, but was luckily quick handed enough to catch it and prevent real damage to some other components.
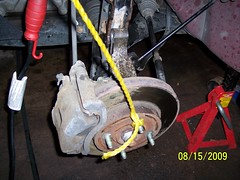
Now unbolt the three nuts holding the spring coil assembly to the top of the car.

Remove the two nuts holding the strut to the steering knuckle. On the Cobalt, the bolts were actually studs, so it wasn't necessary to hold the other end of the bolt with a wrench. On most vehicles, I would assume you'd need to hold the other end of the bolt with a wrench.
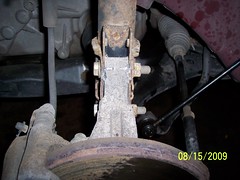
Once the nuts are off, push or hammer the bolts out of the strut and remove the coil spring assembly.

Now use a MacPherson Strut Spring Compressor—similar to this one: Strut Puller on each side of the coil spring. These come in a pair and you must use both (one on each side). They can usually be rented from the same auto shop that sold you the struts. One shop I know has you pay for them in full and then gives refund in full if you bring them back (no rental charge, but a 100% deposit).
Note: Read the instructions that come with your tool carefully. If you spring compressor has safety pins, use them to lock the spring compressor on the coil spring at both points it attaches to the spring. If it doesn't come with safety pins, it might be a good idea to get a tool that does. Do NOT attempt to jerry rig some other method of compressing the coil spring. This is probably the most dangerous part of the job. Remember to tighten each compressor a little bit at a time, alternating between spring compressors as you do this.
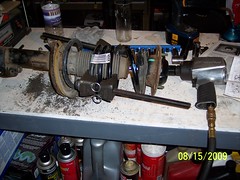
If not present, paint a small mark on the top of the coil spring assembly and paint another mark on the side just below it. You'll need them to line the top up when you re-assemble the it after removing the strut. Not greenish mark on top of coil spring assembly on photo above (right side of photo).
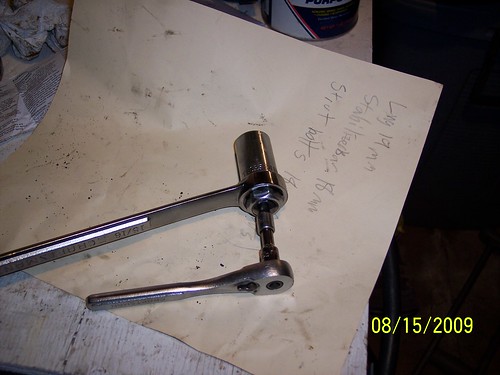
To remove the strut from the compressed coil spring, you'll need a offset strut socket, or one like that shown below, a wrench that fits the back of the socket, an extender that will fit through the back of the socket and a socket that will fit the end of the strut's rod. For the factory originals, this happened to be a size 45 Torx. The nut holding the strut was a 13/16” nut. Assemble the components as shown. Then slip the assembly over the nut holding the strut, hold the ratchet and loosen the nut using the wrench. Once off, remove the top of the coil spring assembly and remove the strut. It goes back in the same way—remember to pull off and re-use the rubber boot on the strut.

Re-assemble the coil spring assembly with the new strut—remember to use the paint marks to line up the top of the assembly.
Remove the spring compressors. Loosen each side a little at a time. This is probably the other most dangerous part of the job.
Replace the coil spring assembly with the new strut. First, place the top back into the car and bolt in, loosely.

Then re-attach the strut to the steering knuckle. Once this is done tighten the nuts on the top of the coil spring assembly. Then re-attach the sway bar link.
Torque all of the bolts to their appropriate setting. I was lucky in that the struts I bought came with a procedure, including torque specifications. Most repair manuals have them as well.
Replace the wheel and lug nuts, screwing them down all the way. Lower the vehicle and torque the lug nuts to their recommended setting. Owner's manual's typically list the recommended setting.
Edit: I was just reading more out of this forum and noted that someone did a how to for spring replacement. You may want to reference it as well prior to doing your own struts, as I noted some great pics of the spring compressor in use. http://www.chevycobaltforum.com/forum/showthread.php?t=300

I've always been scared away from doing struts by others who seemed to know more than me. But, having done it, it seems easy and safe provided you are using the right tools and are using them correctly. On no uncertain terms though, it can be dangerous. Therefore I am only providing this to tell you how I did this. In no way am I telling anyone to do this, especially if they're not comfortable with this repair. Also note, I am a chemist and am not a lisenced mechanic, so as with all things, consider the source.
Struts are a normal wear suspension item that you fortunately don't have to replace very often—or maybe you do based on your driving habits... This procedure was done on an 07 Chevy Cobalt, but likely applies to almost all vehicles that use MacPherson type struts. Of course, bolt sizes and types often differ.
Start by raising and supporting the front of your vehicle on jackstands—if you are not using impact tools loosen BUT DO NOT REMOVE the lug nuts of the wheel(s) you intend to remove. The photo below shows two points I used on my wife's Cobalt.

Remove the front tire on the side with the strut you intend to change—on the Cobalt it's 19 mm lug nuts.

Now mark the position of the strut as it attaches to the steering knuckle—note you'll find a little bit of with paint or maybe white nail polish will work much better than what I used. You should mark where you see in the photo below and along the sides where the strut attaches.

Next remove the nut retaining the sway bar link. On the Cobalt pictured, it's an 18 mm nut. Additionally, on the Cobalt, you'll need to use some sort of liquid wrench on this bolt. Once you break the bolt loose, either pull the sway bar link toward the strut to secure the bolt stud or c-clamp it—it'll make your life much easier on this car, others may vary.

Before going any further, find some way to support the steering knuckle to prevent it from falling any further—you'll note from the photo I did not initially do this, but was luckily quick handed enough to catch it and prevent real damage to some other components.

Now unbolt the three nuts holding the spring coil assembly to the top of the car.

Remove the two nuts holding the strut to the steering knuckle. On the Cobalt, the bolts were actually studs, so it wasn't necessary to hold the other end of the bolt with a wrench. On most vehicles, I would assume you'd need to hold the other end of the bolt with a wrench.

Once the nuts are off, push or hammer the bolts out of the strut and remove the coil spring assembly.

Now use a MacPherson Strut Spring Compressor—similar to this one: Strut Puller on each side of the coil spring. These come in a pair and you must use both (one on each side). They can usually be rented from the same auto shop that sold you the struts. One shop I know has you pay for them in full and then gives refund in full if you bring them back (no rental charge, but a 100% deposit).
Note: Read the instructions that come with your tool carefully. If you spring compressor has safety pins, use them to lock the spring compressor on the coil spring at both points it attaches to the spring. If it doesn't come with safety pins, it might be a good idea to get a tool that does. Do NOT attempt to jerry rig some other method of compressing the coil spring. This is probably the most dangerous part of the job. Remember to tighten each compressor a little bit at a time, alternating between spring compressors as you do this.

If not present, paint a small mark on the top of the coil spring assembly and paint another mark on the side just below it. You'll need them to line the top up when you re-assemble the it after removing the strut. Not greenish mark on top of coil spring assembly on photo above (right side of photo).
To remove the strut from the compressed coil spring, you'll need a offset strut socket, or one like that shown below, a wrench that fits the back of the socket, an extender that will fit through the back of the socket and a socket that will fit the end of the strut's rod. For the factory originals, this happened to be a size 45 Torx. The nut holding the strut was a 13/16” nut. Assemble the components as shown. Then slip the assembly over the nut holding the strut, hold the ratchet and loosen the nut using the wrench. Once off, remove the top of the coil spring assembly and remove the strut. It goes back in the same way—remember to pull off and re-use the rubber boot on the strut.


Re-assemble the coil spring assembly with the new strut—remember to use the paint marks to line up the top of the assembly.
Remove the spring compressors. Loosen each side a little at a time. This is probably the other most dangerous part of the job.
Replace the coil spring assembly with the new strut. First, place the top back into the car and bolt in, loosely.

Then re-attach the strut to the steering knuckle. Once this is done tighten the nuts on the top of the coil spring assembly. Then re-attach the sway bar link.
Torque all of the bolts to their appropriate setting. I was lucky in that the struts I bought came with a procedure, including torque specifications. Most repair manuals have them as well.
Replace the wheel and lug nuts, screwing them down all the way. Lower the vehicle and torque the lug nuts to their recommended setting. Owner's manual's typically list the recommended setting.
Edit: I was just reading more out of this forum and noted that someone did a how to for spring replacement. You may want to reference it as well prior to doing your own struts, as I noted some great pics of the spring compressor in use. http://www.chevycobaltforum.com/forum/showthread.php?t=300
Last edited:

