2.2L LAP/L61 S/C Technical Build Thread

cobalt123

Platinum Member
Joined
Jul 18, 2009
Posts
15,200
Reaction score
4
Location
Tyler Texas
PLEASE NOTE THAT SOME INFORMATION IS QUOTED TO PRESERVE THE ORIGINAL POSTERS CREDIT ITS POSTED HERE AS A MEANS TO CONDENSE A MASSIVE AMOUNT OF INFORMATION

2.2 SC Thread
2.2 FI Thread
Sedan Pic thread
Build Book Left out
http://www.cobaltss.net/forums/showthread.php?t=70397&highlight=install+header]Header
http://www.cobaltss.net/forums/showthread.php?t=92797&highlight=install+header]Header
http://www.cobaltss.net/forums/showthread.php?t=158475&highlight=install+header]Header

First off I have alot of the parts already. to get the thing running, im planning on basicc stage 2 setup, smoothflow 3.0 pulley w/stg 2 hub and 42 lb/hr injectors. Cooling mods include cobra HE w/ LSJ HE, Devils own meth (i know i dont need it now, but i plan to drop to 2.8) im peiceing my own option b together, im getting a resevoir from a Saturn L200 as the hose ports are facing the correct direction as it will be mounted on the left of the engine bay. Dual pass endplate. I bought a trans cooler but its tiny, so i think im going to sell it and get a bigger one.


Car Stats-Current
2006 Chevrolet Cobalt 2.2L L61-NON-SAI
Black Sedan


Suspension and Brakeing

Dropzone Lowering Springs
TTR Rear Sway Bar
SS/TC Front Sway Bar
FE5 Struts/Shocks-need to ordernote: paid for, received bought to install rear FE5 shocks
16in Konig Traction Rims Wrapped in Yokohama rubber
rotors(slotted only), SS brake lines, and wilwood dot4 brake fluid

Used Parts-Bold Parts I Have


Cobra Heat Exchanger (Used from a 03 Mustang Cobra)

Cobra Heat Exchanger Brackets (custom or bwoodyperformance.com)
Eaton M62 Supercharger- 300.00 shipped, 32,000 miles
GM Stage 2 Injectors (42lbs)- 30.00 shipped, 5,000 miles(42lb/hr)
Stock LSJ Tensioner
Stock LSJ Downpipe
Stock LSJ Idler Pulley- used 15 shipped
Stock LSJ Throttle Body
Stock LSJ Serpentine Belt-20 shipped, used
Stock LSJ Intake Manifold- 250 shipped, used
Stock LSJ Exhaust Manifold 20.00 shipped, used ~ 15,000miles
Stock LSJ Alternator Bracket
Stock LSJ Supercharger Pulley-
Stock LSJ Heat Exchanger
Stock LSJ Intercooler Pump

GM Parts- Bold Parts I Have

11900248 – LSJ TB To SC Bolts (4)
12575463 – LSJ TB Gasket
12584342 – LSJ Supercharger Gasket
12594387 – LSJ IC Pump Insulator
12597855 – LSJ Intake Manifold Gasket
12597993 – LSJ Stage 2 Serpentine Belt
12614973 – LSJ 1 Bar Map Sensor
15247280 – LSJ Upper Radiator Hose-cobalt addiction chrome URH
9230949 – LSJ Exhaust Manifold Gasket
11516342 – LSJ Intake Manifold Mount To Block Bolts (2)???
11589214 – LSJ Supercharger to Intake Manifold Bolts (4)
12345982 – Genuine GM Supercharger Oil (Qty 2) 4 oz ea)-not using
12584369 – LSJ TB To Purge Solenoid Tube
12585150 – LSJ IC Pump Rear Bracket To Intake Manifold Mount???
12586367 – LSJ IC Pump Front Bracket To Rear Bracket
12586632 – LSJ Lower Intake Manifold Mount
15226536 – LAP | L61 | L65 Coolant Reservoir
15075118 – LAP | L61 | L65 Coolant Reservoir Cap
15231157 – LSJ Downpipe To Cat Back Gasket-using stock l61
15235773 – LSJ Exhaust Manifold To Downpipe Gasket-using stock l61
15253932 – LSJ Power Brake Booster Vacuum Hose
22729469 – LSJ Windshield Washer Container
22732432 – LSJ Wiper Cowl To Washer Container Hose
88986255 – LSJ 8 Pin TB Connector (LAP | L61 Only 6)
89046833 – IC Pump Connector
90537953 – LSJ Exhaust Manifold Heat Shield
15411879 – 2005 Cavalier Injector Wiring Harness. No cutting needed using GM Stage 2 Injectors-not needed

New Parts- Bold Parts I Have

ZZP Double Gauge Pod(I Have A Sedan)
OTTP SS SC Pulley Bolts(I Have Two Sets)
Aeroforce Interceptor Gauge-
GlowShift Vacuum | Boost Gauge-eBay,$37.00,brand new
AEM Wideband Air | Fuel Ratio Gauge
OTTP 3.0 Polished Pulley (For Stage 2 Hub)
NGK Copper Spark Plugs (Part# LFR6A-11)
AEM Intake-eBay, 70.00, brand new(will tap for meth)
Devils Own Base Meth Kit

Possible Parts in Future

GM Racing Ported head from gm P/N:88958619
GM Racing Dual Valve Springs with Ti Retainers, Spring Seats & Valve Stem Seals

GM Racing Stainless Steel Intake & Inconel Exhaust Valve Set .5mm Oversize

Comp Cams Ecotec N/A Stage III Cams

GM Racing Adjustable Cam Gear Set (DO i really need these? Can't timing be adjusted via the ECU?)

Cometic 2.2L L61 Ecotec 87mm Head Gasket .040

Eagle Forged H-Beam Connecting Rods(Do i need these I would prefer lightweight i beams)

GM Racing Neutral Balance Shaft Set (Or just Delete?)

Wiseco Forged Pistons 10:1CR .020 Overbore Where can I find 11:1? I want to still be able to run 93 Octane and With my e-Mange i could switch between two tunes the other would be self made E-100

see:http://www.boltdepot.com/Fastener-Information/Printable-Tools/
Head Stud Kit
Standard Bolts Needed (Not GM)

LSJ 1 Bar MAP To Intake Manifold
M6 x 1.0 x 25 (Qty 1)


LSJ Intake Manifold Mount Bracket To Intake Manifold
M10 X 1.50 x 50 (Qty 1)


LSJ Rear IC Pump Bracket To Intake Manifold Mount
M8 X 1.25 X 25 – (Qty 2)


LSJ Front IC Pump Bracket To Rear IC Pump Bracket
M8 X 1.25 X 35 – (Qty 2)


LSJ Idler Pulley To Block
M10 X 1.50 x 75 (Qty 1)


LSJ Idler Pulley To Alternator Bracket
M8 x 1.25 x 25


LSJ Intake Manifold To Block
M6 x 1.0 X 75 (Qty 2)


LSJ Alternator Bracket To Block
M8 X 1.25 X 130 (Qty 3)


LSJ SC Bypass Valve To SC
M8 X 1.25 X 20 (Qty 2)


LSJ Tensioner Lower To Alternator Bracket
M8 x 1.25 x 35


LSJ Tensioner Upper To Alternator Bracket
M8 X 1.25 x 40… not standard bolt though. Has to be metric hex socket bolt.


LSJ SC Reservoir Bracket To SC
M6 x 1.0 x 15 (Qty 2)


LSJ SC Reservoir To SC Reservoir Bracket
M6 x 1.0 x 15 (Qty 2)


Questions
(1.) Spark Plugs- i want one step colder, what heat range is good for a 3.0 pullied 2.2?
(2.) Please look over my list see and make any recommendations.:guns:
(3.) Looking at swapping heads, LSJ head on my L61-researching compatibility

Depends on what you idea of high boost actually is. If your looking for an all out race motor running 20+psi of turbo boost go to you Local GM dealer tell them you want this book

Sport Compact Build Book GM P/N: 88958720

That lists the various Ecotech powered GM race car parts.

If your shooting lower than that I would recommend the LSJ because its got (I believe) more aftermarket support and is easier to modify. The LE5 has variable valve timing so its a little more complicated to get right but has just as much potential

simple answer yes
You need to check to see what the combustion chambers displacement is. If they are the same you will know the compression ratio is 9.5 to 1 bigger = lower / smaller = higher
If your l61 is an 07+ you need to make sheer the lsj block has a 58x reluctor wheel
transmission bolt pattern is the same but check your clearance on the lsj oil cooler
i do not know if the crank has the same bolt pattern but if they are different you can just use aftermarket lsj flyweel and clutch if you are auto hope they are the same

http://www.youtube.com/watch?v=H7L13cTv0tI
http://www.cobaltss.net/forums/showthread.php?t=215468&highlight=LSJ+Head+L61
http://www.cobaltss.net/forums/showthread.php?t=27680&highlight=LSJ+Head+L61
http://www.cobaltss.net/forums/showthread.php?t=217656&highlight=LSJ+Head+L61
http://www.cobaltss.net/forums/showthread.php?t=206161&highlight=LSJ+Head+L61
[/COLOR]
CL05065.gif

brakefluidpic.jpg

Wilwood's specially formulated
Hi-Temp 570 Racing Brake Fluid has a minimum 570 F dry boiling point to withstand the severe heat requirements of automotive racing. Hi-Temp 570's low viscosity allows easy bleeding of your brake system, eliminating aeration of the brake fluid caused by foaming due to excessive pumping of the pedal.

ngk_sparkplug_symbol_key.gif


this might help you.

That is for NGK spark plugs

so according to this you may want to try
LTR8IX-11


spark plug info

http://www.gmperformancedivision.com/content/pulse/54/ECOTEC_2.0L_LSJ_Chap_1&2.pdf
8 Pin

Pin A (Dark Green): TP Sensor 1 Signal
Pin B (Light Blue/Black): 5-Volt Ref 2
Pin C (Black): Low Reference
Pin D (Purple): TP Sensor 2 Signal
Pin E (Yellow): TAC Motor control 1
Pin F (Brown): TAC Motor control 2
Pin G (Gray): 5-Volt Ref 1
Pin H (Black/White): Low Reference

6-Pin
Pin A (Brown): TAC Motor control 2
Pin B (Yellow): TAC Motor control 1
Pin C (Tan): Low Reference
Pin D (Dark Green): TP Sensor 1 Signal
Pin E (Gray): 5-Volt Reference
Pin F (Purple): TP Sensor 2 Signal

8-Pin >>> 6 Pin

A > D (Dark Green)
B > E (Gray)
C > C (Tan)
D > F (Purple)
E > B (Yellow)
F > A (Brown)
G > E (Gray)
H > C (Tan)

B/G both go to Pin E (Gray)
C/H both go to Pin C (Tan)

I think those colors are still the same (this was for my L61)
 
Last edited:

cobalt123

Platinum Member
Joined
Jul 18, 2009
Posts
15,200
Reaction score
4
Location
Tyler Texas
hvp4yf.jpg


use the part numbers on the left to order from boltdepot.com

only ones not available are the 130 length ones

In order to get the M8 x 1.25 x 130 and M8 x 1.25 x 125 go here:

Home | Fastenal

the part numbers on there website are as follows: these can change as time passes
M8 x 1.25 x 125-SKU:11113083
M8 x 1.25 x 130-SKU: 0127127

Quote Originally Posted by The Black Stig View Post
Looking for 220WHP+ N/A NO FORCE FEEDING!

Car: 03 Saturn Ion Quad Coupe AKA Suicide Coupe
Good luck - I'd love to see you do it, but I'm not sure you'll be able to accomplish that on the L61. I think the highest NA L61 to date is about 195 IIRC.

Wiseco Forged Pistons 10:1CR .020 Overbore Where can I find 11:1? I want to still be able to run 93 Octane and With my e-Mange i could switch between two tunes the other would be self made E-100
Not sure on the 11:1, and although they may work for the E-100, I don't think it would play too well with 93 octane (in fact, I'm not sure the 10:1 would work too well even?).

1. Tuning Is it possible on the stock ECU? I'm bought an e-mange ultimate for 500 with 8 foot cable so I plan on using this any problems doing that?
I just pulled up GReddy's site and looked at the e-manage...someone please correct me if I'm wrong, but I don't think that e-manage works with our ECUs. However, you can tune the stock ECU - for the same price you dropped on e-manage you can pick up HP Tuners (which is was almost all ecotec owners use to tune).

2. Injectors? What size? Note I will be using E100 also
I'm not exactly sure on the size, but with E-100 I'm thinking maybe 42# or 60#?

3.Also, the F23 trans is the smae for cavies 02-05 right?
The F23 is actually used in the 2000-2005 Cavalier.

With that being said would the Same LSD and Axles work on my Saturn? I'm pretty sure on the LSD the Axles not so much...
I'm not too sure about this.

4.From what I've read my crank shaft is more then strong enough to handle my power goals Is this true?
It's definitely more than strong enough to handle your power goals - Skunk was using the stock crankshaft when he dyno'd at 488whp.

Anything else I'm missing?
6. Intake manifold options? I'm thinking the one form a 2.4 eco and a Ported T/B
A lot of people recommend the 2.4 intake mani...and it should be completely fine for your power goals.

Like I said - I'd love to see you hit 220whp NA on the L61 - but unfortunately I don't see it happening...I don't want to spoil your fun, but I'm just telling you what I know. I may be wrong on some of these questions, so feel free to correct me if I'm wrong - I'm still learning as well.


Q&A i wanted to save

there are no off the shelf pistons higher than 10:1 (wiseco flat tops). Time to break out the custom piston ordering sheet.

the cometic headgasket is a waste of time, just use a stocker.. its thinner, and will raise compression.

"OHHHH… The CAI is killing us. Probably causing all of these issues. Those things cause more problems than they solve.

The CAI is causing the MAF to report less airflow (a very common problem with CAIs) which is causing the fuel to go leaner than before, which is causing the surging (the fuel trims skyrocket at low loads) and also the lower reported HP.

So, the fix here is to retune the MAF curve for this new intake (or ditch the intake)."

Fuel Trims???

There are short term and long term fuel trims. I'll let the service manual explain it to you so I don't mess it up, lol. But now that I've messed around with it, I understand it.

Fuel Trim

The control module controls the air/fuel metering system in order to provide the best possible combination of driveability, fuel economy, and emission control. The control module monitors the heated oxygen sensor (HO2S) signal voltage while in Closed Loop and regulates the fuel delivery by adjusting the pulse width of the injectors based on this signal. The ideal fuel trim values are around 0 percent for both short and long term fuel trim. A positive fuel trim value indicates the control module is adding fuel in order to compensate for a lean condition by increasing the pulse width. A negative fuel trim value indicates that the control module is reducing the amount of fuel in order to compensate for a rich condition by decreasing the pulse width. A change made to the fuel delivery changes the long and short term fuel trim values. The short term fuel trim values change rapidly in response to the HO2S signal voltage. These changes fine tune the engine fueling. The long term fuel trim makes coarse adjustments to fueling in order to re-center and restore control to short term fuel trim. A scan tool can be used to monitor the short and long term fuel trim values. The long term fuel trim diagnostic is based on an average of several of the long term speed load learn cells. The control module selects the cells based on the engine speed and engine load. If the control module detects an excessively lean or rich condition, the control module will set a fuel trim DTC.
 
Last edited:
cobalt123

Platinum Member
Joined
Jul 18, 2009
Posts
15,200
Reaction score
4
Location
Tyler Texas
Taken from Darkstars at Jbody.org

*****Overview*****

“The engine is the heart of a competition car. It must be capable of delivering full power reliably run-after-run on race day, at engine and vehicle speeds far in excess of those encountered in normal driving. Every part of a competition engine must be as nearly perfect as possible – the slightest failure can put you out of the running or even out of the race.

Since 1955, the Small Block Chevy has proven its versatility, durability, and performance potential with automotive performance enthusiasts. The ECOTEC engine has all the basic mechanical components to repeat this success. A sound base engine structure, excellent airflow capability, easy serviceability, compact size and low weight. These qualities, along with the very successful race program, demonstrate the ECOTEC is a driving force in the Sport Compact Segment.

GM’s ECOTEC engine has proven to be a reliable and competitive engine for use in the Sport Compact Drag Racing Series. It has also proven it’s superior durability in grueling five mile runs at the Bonneville Salt Flats with speeds over 300 MPH and in showroom stock endurance road racing competition. The number of stock components utilized in the race engine demonstrates the robust design of the ECOTEC engine.

The ECOTEC’s outstanding feature to performance enthusiasts is it’s impressive strength. GM Racing dynamometer tests confirm that major horsepower gains are possible with minimal modifications. For instance, when building an ECOTEC engine to the 400 hp power level, no modifications to the cylinder head, block, main girdle or crankshaft are required.

The production ECOTEC engine block is manufactured out of aluminum using a lost-foam casting process. This process allows for both a stronger and lighter part. Flanged, thin-wall iron cylinder sleeves are press-fit into a semi-floating aluminum support structure. The ECOTEC block is supported by a massive die-cast aluminum girdle/ main cap assembly and structural oil pan for noise and vibration suppression. The main-cap structures are each supported with six fasteners. Extra-thick main bearings resist the differential thermal expansion of the nodular iron crank and aluminum block.

All ECOTEC blocks are cast with passages for piston-cooling jets and an oil cooler for high-output turbocharged applications. The fully-boxed block requires no windage tray, even on applications up to 600 horsepower. An auxiliary chain drives the water pump and balance shafts from the crank.

To reduce the risk of hot spots, pressure-cast, non-squish dished pistons are manufactured without valve reliefs. The symmetrical, barrel-faced moly-coated top ring fits in an anodized ring-groove below a super-thin 3mmtop ring land, creating a low crevice volume for reduced emissions. The pistons deliver power through full-floating piston pins and powder-metal or forged steel connecting rods.

The ECOTEC twin-cam cylinder head uses low-friction hydraulic roller finger-followers, which have been proven reliable and effective up to 11,000 rpm. Head fastener placement permits cylinder head removal and installation without removing the camshafts. The camshafts are driven directly off the crank by a chain. The design includes provisions for future upgrading to variable cam phasing. The finger-follower design permits a light-weight narrow profile and reduced valve angles(the intake valve is 18 degrees from vertical and the exhaust valve 16 degrees).

The design of the intake manifold eliminates the need for variable-length intake runners and consideration has been made for conversion to gasoline direct-injection.

The ECOTEC engine management system uses a port-EFI design with cassette waste-spark ignition. An integral compression-sense ignition module eliminates the need for a cam position sensor.” – GM Sport Compact Performance Build Book
....
 
Last edited:
cobalt123

Platinum Member
Joined
Jul 18, 2009
Posts
15,200
Reaction score
4
Location
Tyler Texas
Taken from Darkstars at Jbody.org

*****The basics*****


-Engine configuration – inline 4 cylinder gas engine
-Valve train – DOHC 16 valve with hydraulic roller finger followers
-Displacement - 2.2 Liter (134 CID) (2189 CC)
-Bore x Stroke – 86 mm x 94.6 mm
-RPO – L61
-Vin code –F
-HP – 140 @ 5600 RPM
-TQ – 145 @ 4000 RPM
-Oil pressure @1,000 RPM – 50-80 psi
-Engine cranking compression pressure - 185-225 psi
-Compression ratio - 10:1
-Firing order- 1-3-4-2
-Ignition –cassette waste spark
-Recommended octane – 87
-Fuel Delivery – return less Sequential fuel injection (SFI)
-Fuel pressure – key on engine off – 50-60 psi
-EPA rated fuel economy (manual trans) 26 MPG City & 37 MPG highway 30 MPG combined
-Generator rated output – 105 A
-Generator load test output – 73 A
-Thermostat opening temperature – 180 degrees F
-Emissions – Low emissions vehicle equipt with single Catalyst

*****Fluids and Capacities*****

-Brake Fluid – Delco Supreme II or equivalent Dot 3 brake fluid
-Clutch fluid - Hydraulic Clutch Fluid (GM Part No. U.S. 12345347, in Canada 10953517) or equivalent DOT-3 brake fluid
-Engine Oil - SAE 5W-30 is the only viscosity grade recommended for your vehicle.
Use only oils which have the API Starburst symbol and which are also identified as SAE 5W-30.If the temperature range is 0°F (-18°C) or above SAE 10W-30 oil which has the API Starburst symbol is acceptable if SAE 5W-30 oil is not available. Areas where the temperature falls below -20°F (-29°C), it is recommended either an SAE 5W-30 synthetic oil or and SAE 0W-30 oil. Both will provide easier cold starting and better protection for the engine at extremely low temperatures. Do not use other viscosity grade oils, such as SAE 10W-40 or SAE 20W-50 under any conditions.
-Engine oil capacity – 5 qts
-Coolant – Dexcool antifreeze – 50/50 mix with drinkable water
-Coolant capacity - 8.6 qts
-Auto trans fluid - DEXRON-III Automatic Transmission Fluid
-Auto trans fluid capacity – bottom pan removal – 6.9 qts, complete overhaul - 9.5 qts
-A/C refrigerant – R134a
-Power steering fluid - GM Power Steering Fluid GM P/N 89021184 (Canadian P/N 89021186) or equivalent


*****Torque Specs *****


NOTE- some specs are FOOT pounds, some are INCH pounds, do not confuse the two. And keep in mind some common sense is your best friend, if you come across something that says valve cover is torqued to 75 lb ft common sense should tell you that is way to much, torque spec listings are not always 100% accurate, just use your head. And BTW I did not copy and paste this list cause I find it somewhere, I looked it all up and recorded them (hand typed them) one at a time, you guys better get some use out of this LOL.


-A/C compressor to block bolt………………….….. 20 N-m / 15 lb ft
-Balance shaft adjustable chain guide bolt……… 10 N-m / 89 lb in
-Balance shaft bearing carrier to block bolt …..…..10 N-m / 89 lb in
-Balance shaft fixed chain guide bolt………...…….10 N-m / 89 lb in
-Balance shaft sprocket bolt………………………...50 N-m / 37 lb ft
-Block heater bolt………………………………...…...10 N-m / 89 lb in
-Cam cover to cylinder head bolt …………………..10 N-m / 89 lb in
-Cam cover to ground cable bolt……………………10 N-m / 89 lb in
-Cam cover to ground cable stud……………………10 N-m / 89 lb in
-Camshaft bearing cap bolt………………………….10 N-m / 89 lb in
-Camshaft sprocket bolt
First pass ………………………............……85 N-m / 63 lb ft
Second pass ……………………..........……30 degrees
-Camshaft timing chain tensioner …………………..75 N-m / 55 lb ft
-Chain guide plug ………………………….....………..80 N-m / 59 lb ft
-Connecting rod bolt
First pass ………………………..............……25 N-m / 18 lb ft
Second pass …………………….............…...100 degrees
-Crankshaft bearing – lower crankcase to block
First Pass ……………………...............………20 N-m / 15 lb ft
Second pass ……………….............…………70 degrees
-Crankshaft position sensor bolt ……...………………10 N-m / 89 lb in
-Crankshaft pulley bolt
First pass ……………………...............………100 N-m / 74 lb ft
Second pass …………………..............………75 degrees
-Cylinder head bolt
First pass ………………………...............…….30 N-m / 22 lb ft
Second pass ……………………...............……155 degrees
-Cylinder head front crankcase bolt ……….....…………35 N-m / 26 lb ft
-Cylinder head oil gallery plug …………......……………35 N-m / 26 lb ft
-Dipstick guide to intake manifold bolt ….....…………...10 N-m / 89 lb in
-Drive belt tensioner bolt ……………….......…………….45 N-m / 33 lb ft
-E.G.R. cover bolt ……………………….........……………25 N-m / 18 lb in
-Elek. ICM cover bolt …………………………..........……..10 N-m / 89 lb in
-Engine coolant temp sensor ……………........…………22 N-m / 16 lb ft
-Engine lift bracket front bolt …………………........……...25 N-m / 18 lb ft
-Engine lift bracket rear bolt …………………….......…….25 N-m / 18 lb ft
-EVAP emission canister valve nut ……………......……..22 N-m / 16 lb ft
-Exhaust manifold to cylinder head nut ……….....………12 N-m / 9 lb ft
-Exhaust manifold to cylinder head stud …….....………..10 N-m / 89 lb in
-Exhaust manifold pipe flange stud ……….......…………16 N-m / 12 lb ft
-Flex plate (AMT) bolt
First pass ………………....................……………53 N-m / 39 lb ft
Second pass …………..................………………25 degrees
-Flywheel (SMT) bolt
First pass …………………...................................…….…….53 N-m / 39 lb ft
Second pass …………………….……..................................25 degrees
-Front cover to block bolt …………………………...........…25 N-m / 18 lb ft
-Fuel pipe bracket bolt ………………………………...........10 N-m / 89 lb in
-Fuel rail bracket stud …………………………..........……..10 N-m / 89 lb in
-Generator to block bolt ………………............……………..20 N-m / 15 lb ft
-Heat shield to exhaust manifold bolt ………………..........10 N-m / 89 lb in
-Intake camshaft rear cap bolt ………………………...........25 N-m / 18 lb ft
-Intake manifold to cylinder head bolt …………..........……10 N-m / 89 lb in
-Intake manifold to cylinder head nut ………………...........10 N-m / 89 lb in
-Intake manifold to cylinder head stud ………………...........6 N-m / 53 lb in
-Knock sensor bolt …………………………………..............25 N-m / 18 lb ft
-Lower crankcase to block peripheral bolt ……........…….25 N-m / 18 lb ft
-Oil gallery plug ……………………………….……...............35 N-m / 26 lb ft
-Oil gallery plug – rear ……………………….............………60 N-m / 44 lb ft
-Oil filter housing cover ………………………..............……..22 N-m / 16 lb ft
-Oil pan drain plug……………………..............……………...25 N-m / 18 lb ft
-Oil pan to block bolts ……….............……………………….25 N-m / 18 lb ft
-Oil pressure switch …............……………………………….10 N-m / 89 lb in
-Oil pump cover bolt ………………………………..............….6 N-m / 53 lb in
-Oil pump pressure relief valve plug ……..........…………...40 N-m / 30 lb ft
-Oxygen sensor …………………….............…………………42 N-m / 31 lb ft
-Power steering pump bolt …..........………………………...25 N-m / 18 lb ft
-Spark plug ……………………………………….............…...20 N-m / 15 lb ft
-Starter motor to block bolt ………………...........…………..40 N-m / 30 lb ft
-Thermostat housing to block bolts ............………………..10 N-m / 89 lb in
-Throttle body bolt ………………………………….................10 N-m / 89 lb in
-Throttle body nut …………………………..............…………10 N-m / 89 lb in
-Throttle body stud ………………………………...............……6 N-m / 53 lb in
-Timing adjustable chain guide bolt ……..........……………10 N-m / 89 lb in
-Timing chain oil nozzle bolt ………………………................10 N-m / 89 lb in
-Timing fixed chain guide bolt ………………..............………10 N-m / 89 lb in
-Timing upper chain guide bolt ……………………...............10 N-m / 89 lb in
-Vent tube to cylinder head ……………………….............….15 N-m / 11 lb ft
-Water pump access cover bolt …………………...........…….7 N-m / 62 lb in
-Water pump / balance shaft chain tensioner bolt …..........10 N-m / 89 lb in
-Water pump bolt ……………………………………...............25 N-m / 18 lb ft
-Water pump sprocket bolt …………………..............……….10 N-m / 89 lb in
....
 
Last edited:
cobalt123

Platinum Member
Joined
Jul 18, 2009
Posts
15,200
Reaction score
4
Location
Tyler Texas
selling the intercooler i also got the intake mani coming in soon,

btw i have the lsj motor mount which now that i think of it is no good for 2.2 anyone want it

thanks, i saw it earlier but i decided in favor of the other area cuz it didnt come this way factory noob error lol

Oil Change
Oil change
Install How To:
Hunterkiller
Becks
Tom's Build Info:
Install info
Ecotec Build Guige:
Build Guide Link

Note for Transmission Coolers:
INSTALL TRANNY COOLER
Note on installing SS/TC Front Strut Bar

FE5 BAR INSTALL
Here is the P# for the bushings you'll need to use the stock 1 bolt/1 slot clamp 22700091('05 only)

To upgrade to the 2bolt clamp you need these bushings 15822993 and these clamps 10389617

Dual Pass
http://www.frozenboost.com/product_...=1015&osCsid=b4aca155b89f4eb25348cd3413f25b84
DIY Dual Pass

Attention Auto Trans Owners
The reason it won't fit is because the automatic transmission makes the engine sit forward more than standard. therefore if you connect the DP it will pull the rest of the exhaust forward and will cause the DP to rub on the front sway bar. It has nothing to do with the header..

Links
http://www.siliconeintakes.com/index.php?cPath=17&osCsid=40f1db42a5c5f84c0e5c2dafb4310c6d
http://www.extremepsi.com/store/customer/product.php?productid=17629&cat=1007&page=1
http://en.wikipedia.org/wiki/AN_fitting

Ecotec Links:
FAQs
Engine Breakdowns
short history of ecotec

119115985.gif

119116010.gif


There are 2 modules in the throttle actuator control (throttle body) and 2 modules in the ECU that monitor the throttle position. Each module in the ECU monitors its own voltage from each signal in the throttle body. If there is too much of a variance in the voltage the P2135 code comes up.

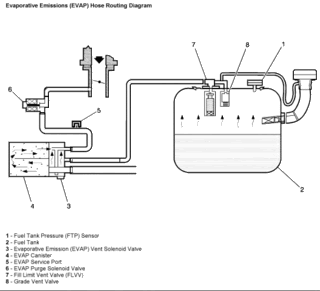
There is a bulletin about wiring rubbing against the evap solenoid and causing this code, but my wires there are in tubing and there is no open or damaged wires.

So, it states either wiring, a bad throttle body or bad PCM. For it to be a PCM people say and the GM manual says that you should have other codes to go with it. So it is either wiring or my used LSJ TB.
 
Last edited:
cobalt123

Platinum Member
Joined
Jul 18, 2009
Posts
15,200
Reaction score
4
Location
Tyler Texas
thought so, well its not expensive, plus some one will want to buy it

CobraHeatExchangerInstalSchematicjp.jpg


• FE1 suspension – standard on LS, LT and LTZ models, it provides a smooth ride and includes a 19-mm front stabilizer bar and a 16-mm rear stabilizer bar

• FE3 suspension – standard and available only on SS models, it delivers a firmer, more direct ride and includes 22-mm front and rear stabilizer bars, four-wheel disc brakes, monotube shocks and 17-inch wheels and performance tires

• FE5 suspension – standard on the SS Supercharged, it was developed on the racetrack to deliver sports car levels of handling and grip; 24-mm front stabilizer bar and 22-mm rear stabilizer bar, higher-rate springs and bushings, four-wheel disc brakes, monotube shocks and 18-inch forged aluminum wheels with complementing performance tires

From the outset, engineers designed Cobalt to be a responsive, fun-to-drive car. Cobalt’s underbody uses high-strength steel as welded members in strategic locations for maximum strength, structural integrity, mass optimization and crashworthiness. The underbody boasts a rigid bending frequency of nearly 27 Hz.


All Cobalt models feature a strut-type front suspension, semi-independent torsion beam rear suspension, and front and rear stabilizer bars for more exact body roll control. Speed-sensitive electric power steering is tuned to match the performance levels of the various tire and suspension packages.


The Cobalt rides on a MacPherson strut front suspension and a semi-independent, torsion beam rear suspension. Front and rear stabilizer bars – uncommon features for compact cars in Cobalt’s price range – are standard on all models. Suspension tuning for each model, including steering feel, spring rate and stabilizer bar diameter, is dialed in to provide distinct driving and handling characteristics.


Cobalt’s strut-type front suspension is compact yet provides long wheel travel, with 90 mm of compression travel and 87 mm of rebound, which is substantially more than most competitors and enhances overall ride and handling. Monotube rear shocks are used for a more precise road feel. L-shaped front control arms contain a forward pivot bushing, which transmits most of the cornering force, and a larger, high-damped composite rear elastomeric bushing that allows rearward movement to minimize harshness from road surface impacts. The front control arms are made from steel on the FE1 suspension and are aluminum on the FE3 and FE5 suspensions.


The direct-acting front stabilizer bar connects to each strut for precise steering response and improved cornering agility with decreased body roll. All front suspension components are mounted to a new, rigid cradle assembly comprised of four large hydroformed steel tubes and two side members that are integrally welded to front and rear cross members. The cradle is mounted to the Cobalt’s space frame at four widely spaced points.


Cobalt’s torsion beam rear suspension provides excellent ride and handling, while maximizing interior space. A hydraulic rear suspension bushing is employed on the FE1 suspension to improve the ride and suppress road noise. Rear wheel travel, at 126.5 mm in jounce and 68.5 mm in rebound, is longer than most vehicles in the segment.


Vented front disc brakes with single-piston calipers and composite rear drum brakes are standard on LS, LT and LTZ. Four-wheel anti-lock brakes (ABS) are standard on LT and LTZ models, and optional on LS. Four-wheel disc brakes with ABS are standard on SS and SS Supercharged models. Cobalt also offers an enhanced electronic traction control system on all models equipped with an automatic transmission and ABS; this system is standard on LTZ.
Enhanced traction system (ETS) is integral with automatic-equipped Cobalts with ABS. ETS enhances traction by adjusting engine torque if wheel slip is detected.

http://www.crateenginedepot.com/store/Cobalt-Sway-Bars-and-Components-C512.aspx

http://www.crateenginedepot.com/store/Cobalt-FE5-Struts-and-Shock-Pkg-FE5-S-P2433C514.aspx

DSCN0551.jpg
--later sold spark plugs cuz they are not copper tops
DSCN0552.jpg
 
Last edited:
cobalt123

Platinum Member
Joined
Jul 18, 2009
Posts
15,200
Reaction score
4
Location
Tyler Texas
Actually I revised my list to talk about the MAP sensors, etc. Here it is... I hope you enjoy.

This list is broken down to bare essentials for supercharging only and then adds the optional exhaust and optional wiper conversion lists. What type of injectors, pulley’s and other items you choose to change are strictly up to you. This is the list that I used and have modified it for a universal parts list.

Supercharger Related Parts Only
(Bare Essentials To SC Your 2.2 or 2.4)

New GM Parts

12575463 – LSJ TB Gasket
11900248 – LSJ TB To SC Bolts (4)
12584342 – LSJ Supercharger Gasket
12594387 – LSJ IC Pump Insulator
89046833 – IC Pump Connector
12597855 – LSJ Intake Manifold Gasket
12597993 – LSJ Stage 2 Serpentine Belt
15247280 – LSJ Upper Radiator Hose
15411879 – 2005 Cavalier Injector Wiring Harness
15253932 – LSJ Power Brake Booster Vacuum Hose
12584369 – LSJ TB To Purge Solenoid Tube
12585150 – LSJ IC Pump Rear Bracket To Intake Manifold Mount
12586367 – LSJ IC Pump Front Bracket To Rear Bracket
12586632 – LSJ Lower Intake Manifold Mount
11516342 – LSJ Intake Manifold Mount To Block Bolts (2)
11589214 – LSJ Supercharger to Intake Manifold Bolts (4)
12345982 – Genuine GM Supercharger Oil (Qty 2) 4 oz ea))

Purchasing the LSJ power brake booster hose takes care of 2 issues. I cut off the ends of my 2.2 hose and used it as a PCV hose from the valve cover to the LSJ air intake hose. It gives you the correct hose from your power brake booster to SC and gives you a factory looking formed hose for your PCV hose.

New Non- GM Parts

ZZP Heat Exchanger
GlowShift Vacuum | Boost Gauge
AEM Wideband Air | Fuel Ratio Gauge
OTTP 2.9 Polished Pulley (For Stage 2 Hub)
M-8501-L54 Ford Racing Intercooler Pump
NGK Copper Spark Plugs (Part# LFR6A-11) (Also one step colder)

Copper plugs are better than Iridium plugs or any other plugs for supercharged applications. People have gaps anywhere from .035 to .040. They come .040 and that is what I am using.

Used Parts

Eaton M62 Supercharger
GM Stage 2 Injectors (42lbs)
Stock LSJ Air Intake
Stock LSJ Tensioner
Stock LSJ Idler Pulley
Stock LSJ Throttle Body
Stock LSJ Intake Manifold
Stock LSJ Alternator Bracket

Optional Parts

ZZP Triple Gauge Pod
Aeroforce Interceptor Gauge

Injector Harness

I used the 2005 Cavalier injector wiring harness because it came with the proper connectors for using the original GM 42.5 lb Stage 2 injectors. I did have to splice my MAP sensor connector in from my original harness as I started out with the stock MAP sensor.

MAP Sensor

You can choose to use 3 different MAP sensors for your conversion. Which MAP sensor you choose will also depend on the connector needed to be used.

Stock MAP
This MAP sensor fits into the LSJ intake manifold, but you must modify the opening in the sensor where it screws into the intake. How I modified the sensor is in my SC build thread. This is the least expensive option and is the least hassle option.

LSJ 1 Bar MAP
This is the MAP sensor that is used in the SC on the stock LSJ. We can take that sensor and use it in the LSJ intake manifold. You will need to modify a means to secure it and also seal it to the LSJ intake manifold. How I modified this sensor to fit my car is also in my SC build thread. I would honestly say this is the least optimal choice out of the 3 possibilities for me.

LSJ 2.5 Bar MAP
This is the real MAP sensor used on the stock LSJ in the intake manifold. It best fits the stock LSJ intake manifold (obviously). This MAP sensor also has a temp sensor, otherwise known as IAT2 (Intake Air Temperature 2). Our cars cannot read the temp without modification. How I did the 2.5 bar MAP sensor conversion to read IAT2’s is also in my SC build thread.

Throttle Body Connector

If you are using the LSJ throttle body the connector you’ll need to have is an 8 pin. Regardless of what connector you do have or if you have to purchase the 8 pin, you will need to wire them for the LSJ TB.

2005 – 2006 2.2’s have an 8 pin connector. No new connector is needed.
2007+ 2.2’s have a 6 pin connector and you will need the 8 pin connector.

2006 – 2007 2.4’s have an 8 pin connector. No new connector is needed.
2008+ 2.4’s have a 6 pin connector and you will need the 8 pin connector.

If you need the 8 pin connector you’ll need the one below.

88986255 – LSJ 8 Pin TB Connector

Supercharger Cooling System

New GM Parts

22697069 – LSC SC Coolant Reservoir
15076936 – LSJ SC Coolant Reservoir Cap
15271970 – LSJ SC Coolant Reservoir Bracket
22697111 – LSJ SC Coolant Reservoir Overflow Hose
22699879 – LSJ SC Coolant Reservoir Inlet To Top Intake Manifold End Plate Hose
22707607 – LSJ Bottom Intake Manifold End Plate To Intercooler Pump Outlet Hose

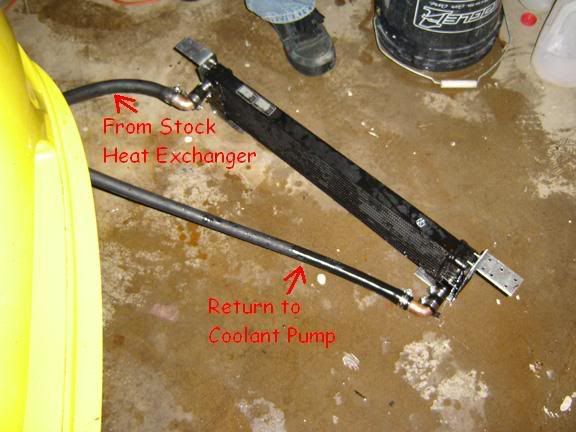
Hose routing is with using ZZP heat exchanger only with 10 feet of ¾ heater hose. The house routing diagram I used is in my SC build thread.

First hose went from LSJ SC coolant reservoir outlet to ZZP heat exchanger inlet.
Second hose went from intercooler pump inlet to ZZP heat exchanger outlet.

I chose the stock SC cooling system for now. If you choose to use option B or any other alternative then you will need different hoses and lengths of hose.

I am running a 2.9 pulley with the ZZP heat exchanger only and my IAT2 temps are within +20 to +30 above ambient temp (which is optimal). Of course in traffic or during heavy WOT runs the temps are higher as expected (which is normal). This cooling method is very adequate.

Standard Bolts Needed (Not GM)

MAP To Intake Manifold
M6 x 1.0 x 25 (Qty 1)

LSJ Intake Manifold Mount Bracket To Intake Manifold
M10 X 1.50 x 50 (Qty 1)

LSJ Rear IC Pump Bracket To Intake Manifold Mount
M8 X 1.25 X 25 – (Qty 2)

LSJ Front IC Pump Bracket To Rear IC Pump Bracket
M8 X 1.25 X 35 – (Qty 2)

LSJ Idler Pulley To Alternator Bracket
M8 x 1.25 x 25

LSJ Intake Manifold To Block
M6 x 1.0 X 75 (Qty 2)
M6 x 1.0 x 25 (Qty 5)

LSJ Alternator Bracket To Block
M8 X 1.25 X 130 (Qty 3)

LSJ SC Bypass Valve To SC
M8 X 1.25 X 20 (Qty 2)

LSJ Tensioner Lower To Alternator Bracket
M8 x 1.25 x 35

LSJ Tensioner Upper To Alternator Bracket
M8 X 1.25 x 40… not standard bolt though. Has to be metric hex socket bolt.

LSJ SC Reservoir Bracket To SC
M6 x 1.0 x 15 (Qty 2)

LSJ SC Reservoir To SC Reservoir Bracket
M6 x 1.0 x 15 (Qty 2)

End of bare essentials list to supercharge your 2.2 or 2.4. The rest of the list below is simply optional.

------------------------------------------------------------------------------------------------------------------------------------------

Exhaust Parts (Optional)

GM Parts

90537953 – LSJ Exhaust Manifold Heat Shield
15231157 – LSJ Downpipe To Cat Back Gasket
15235773 – LSJ Exhaust Manifold To Downpipe Gasket

Use your stock 2.2 or 2.4 exhaust manifold gasket, or buy new, as if you used the LSJ exhaust manifold gasket it wouldn’t fit properly and you would have an exhaust leak and/or noise.

Used Parts

Stock LSJ Downpipe
Stock LSJ Exhaust Manifold

The stock LSJ downpipe works on any manual shift car. It does not fit the automatic because of the way the automatic engine sits in the vehicle.

The LSJ exhaust manifold and LSJ downpipe are much bigger to allow more exhaust to exit the engine. This is important as you are forcing more air into the engine with the supercharger so you need to provide adequate output as well. Feel free to purchase your aftermarket selection of header/dp combo.

Windshield Wiper Conversion (Optional)

GM Parts

22729469 – LSJ Windshield Washer Container
22732432 – LSJ Wiper Cowl To Washer Container Hose

You’re moving the LSJ air intake to the left side of the vehicle and that is where the 2.2 and 2.4 windshield wiper container is. The container I listed includes a new pump, grommet, cap and hose to attach to wiper cowl hose. The wiper cowl to container hose I list is the original GM hose on the LSJ that goes from the left side of the wiper cowl (where ours is) and takes it to the right side where it meets up with the LSJ washer container that I list. As far as the connector for the pump, I cut the end of the connector off and added new wire to loom it from the left side of the car to the right side of the car to the new container location. I ran the loom across the top of the inside of the radiator support where there is already a loom running for something else. I ran it inside its own loom and wire tired to the existing loom.
DSCN0561.jpg

DSCN0562.jpg


DSCN0447.jpg

DSCN0448.jpg

DSCN0449.jpg

DSCN0450.jpg

DSCN0451.jpg
 
Last edited:
cobalt123

Platinum Member
Joined
Jul 18, 2009
Posts
15,200
Reaction score
4
Location
Tyler Texas
no problem, just remember for the most part "The Garage" is for mechanical/tech stuff and "The Custom Shop" is appearance items.

thanks for the clarification

How to Install Cobra Heat Exchanger-

Ok, well this is my first write up EVER! I'm going to tell you how to install a Cobra heat exchanger in a Cobalt SS S/C. Its a fairly long and difficult project, but I got through the entire project and spent less than $100!!!
Things you will need:
- Cobra Heat Exchanger (DUH)
- 4 Metal "L" brackets, 2 long and 2 short
- Hack saw
- Drill
- 6 self drilling sheet metal screws (or other mounting hardware)
- 4 small bolt/nuts
- Lots of zip-ties
- 8 Hose clamps
- A good length of 3/4" heater hose (8-10 feet)
- Pliers
- A set of tools (wrenches/sockets)
- A jack and 2 jack stands
- A person to help you
- A clear head & lots of patience
bareHE.jpg

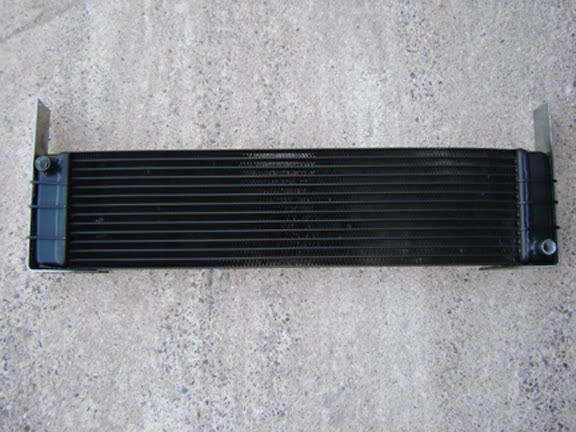
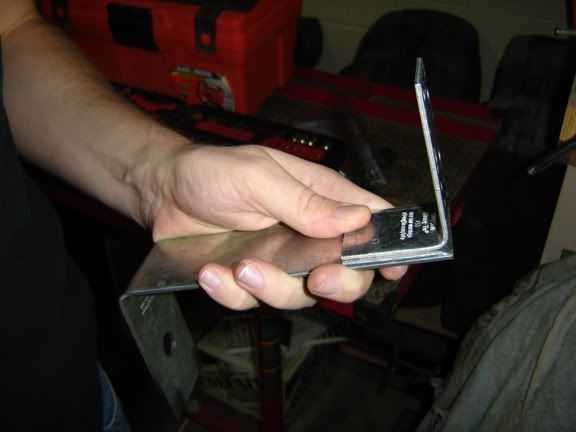
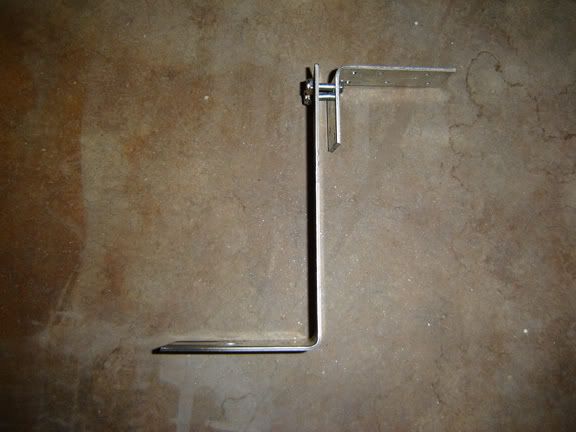
Heres the heat exchanger, your going to cradle the heat exchanger with the 2 large L brackets, and secure it to the heat exchanger via 6 zip-ties. Then your going to cut the long L bracket so that the top of the bracket only sticks about 1/2" to 3/4" above the top of the heat exchanger. Then just cut a little bit off the small bracket so that it doesn't touch the zip-ties.
Brackets1.jpg

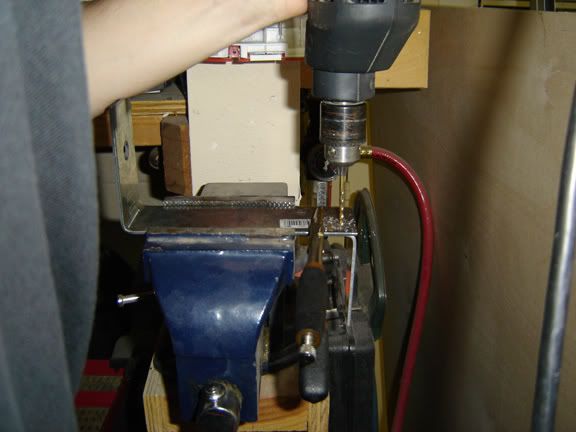
Then your going to take the brackets off, and line them up ready to drill the holes.
Brackets2.jpg

Your going to drill 2 holes near the top of the bracket. After you've done that, secure the brackets together with 2 bolt/nut assemblies. It should look like this
Brackets3.jpg

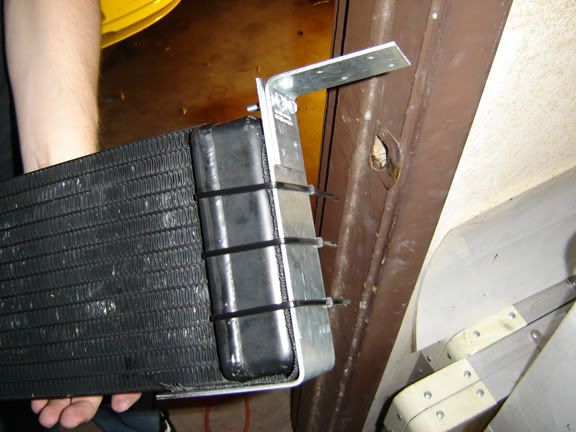
Once again secure the new bracket to the heat exchanger via zip-ties.
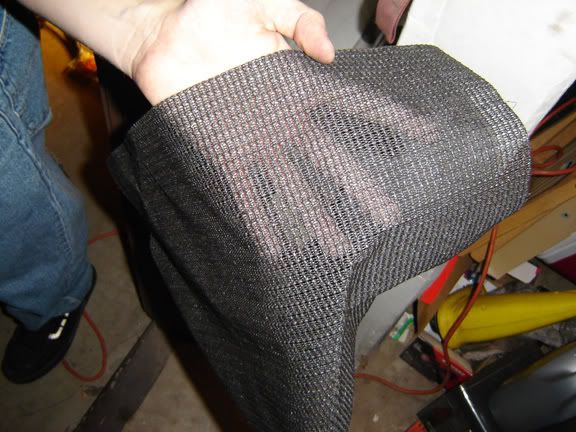
ClothStuff.jpg

Due to metal to metal contact, we used this cloth stuff (not sure what its called) to place between the heat exchanger and the brackets, it helped prevent rattling and made a tighter fit. At this point your heat exchanger should look like this
Brackets4.jpg

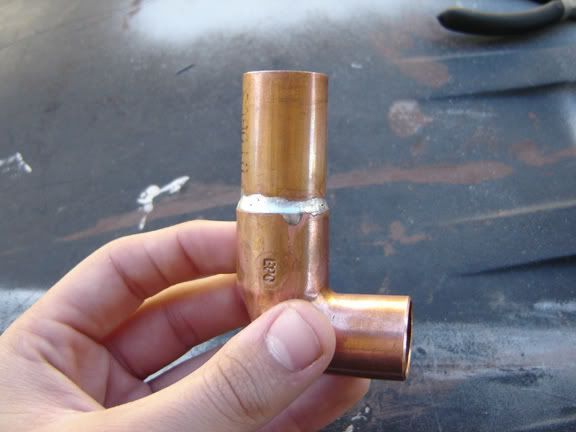
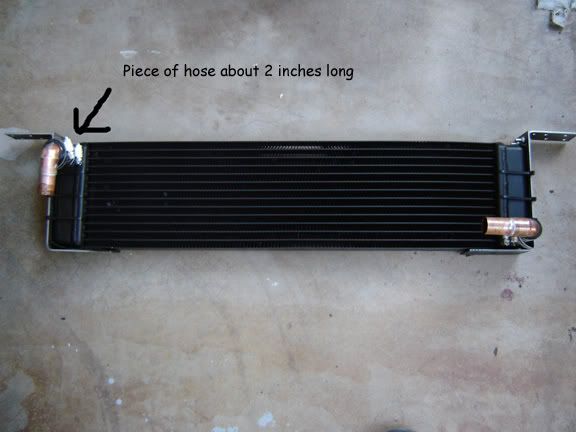
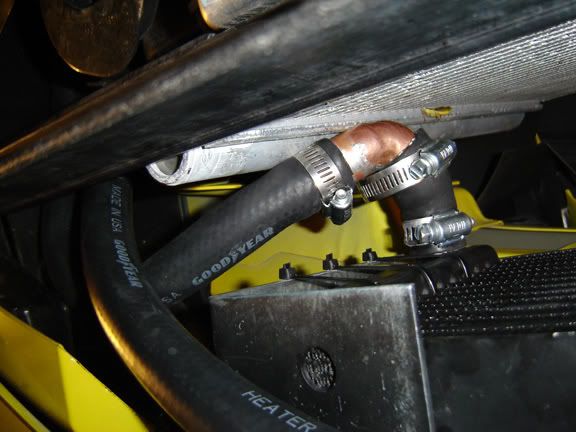
Now that the brackets are out of the way, we can focus on hose fittings. Due the lack of space, we had to use 2, 3/4" 90 degree elbows, we soldered two pieces together for ours, I'm sure you could find a single piece fitting somewhere.
Hosefitting.jpg

We then cut a piece of hose to about 2" in length, we put one end on the heat exchanger fitting, and one end on the elbow fitting. The piece of hose should be just long enough to keep the two fittings from touching. Then use 4 hose clamps to secure the two fitting together.
Hosefitting2.jpg

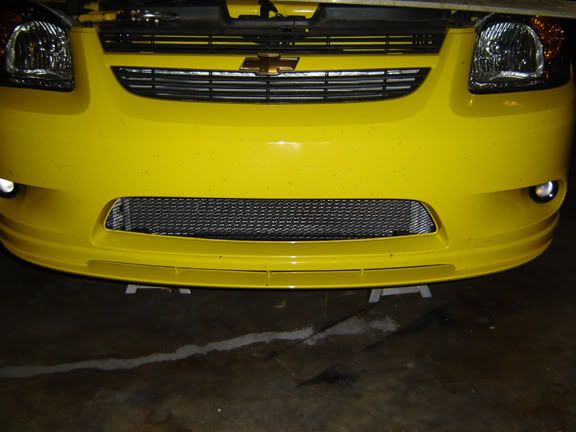
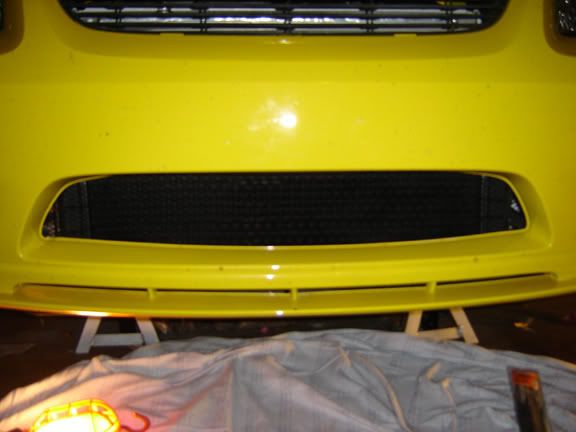
Since the heat exchanger will sit so close to the front of the vehicle and to the air flow, I decided to do a lower mesh grill to protect the heat exchanger from flying debris. If you want to learn how to put a lower mesh grill on, Click Here
LowerGrill.jpg

This concludes part one of the install.
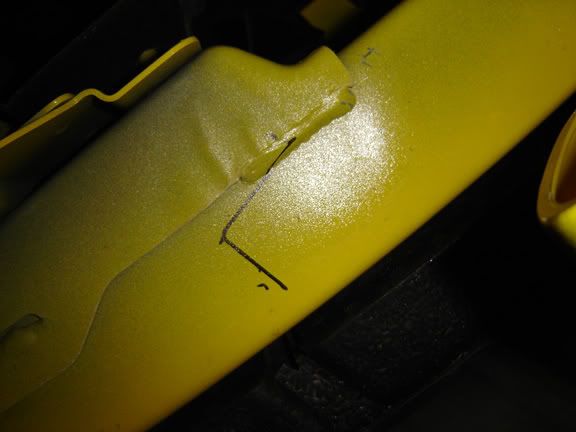
At this point we lifted the heat exchanger in place and made marks where the brackets were.
Mark-up.jpg

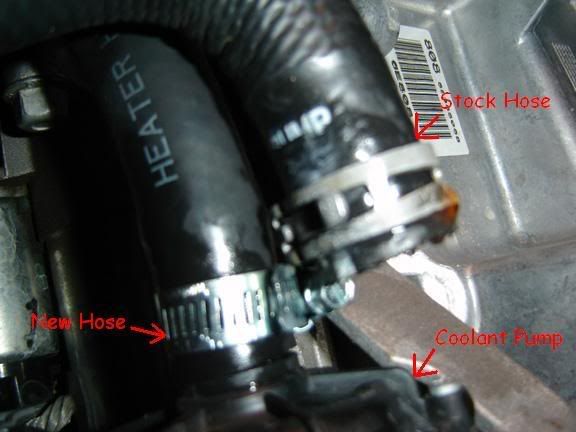
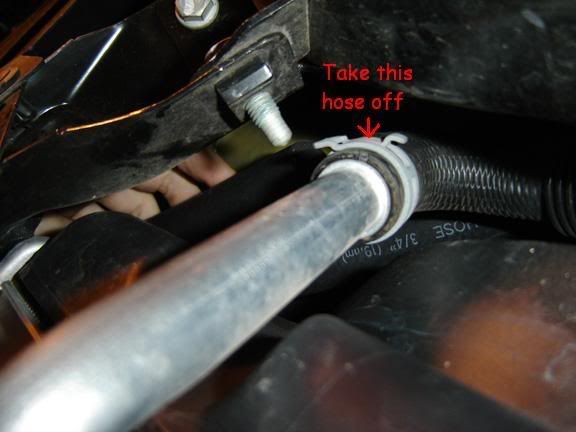
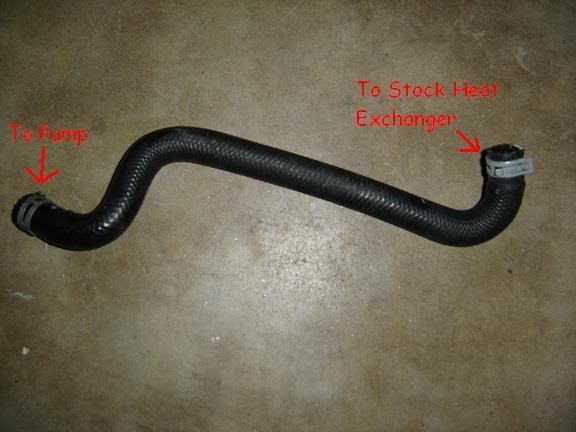
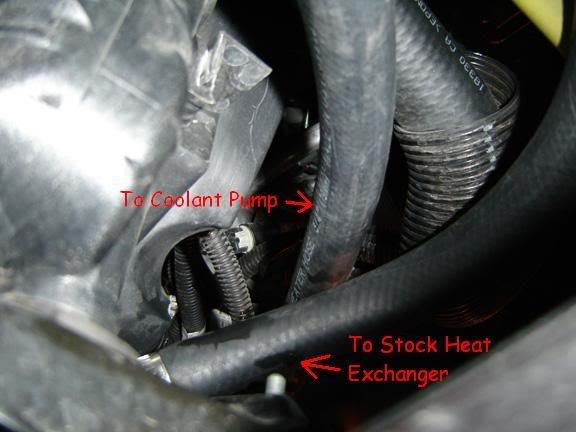
Now comes the messy/difficult part. Removing the stock coolant line. Your going to remove the stock return line from the stock heat exchanger to the pump, and put the new lines in place to plumb in the new heat exchanger.
pumphose.jpg

HEhose.jpg

This is the line you need to remove
hosefromhell.jpg

Then connect the new hoses and route them out through the driver side front fender
HoseRouting.jpg

Now cut the hoses to length and connect them to the heat exchanger
Hoseconnection.jpg

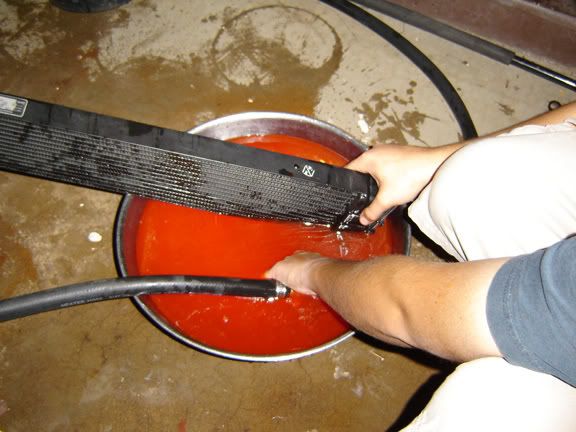
This is where it may get difficult, due the fact that there are now air pockets in the system, you need to bleed the system. We simply submerged the heat exchanger and return line (disconnected) in dex cool, and turned the pump on. It bled its self out and we re-connected the return line while submerge to eliminate exposure to air. It took a few tries but we got all the air bled from the system.
Bleedingsystem.jpg

Now that the system is bled, place the heat exchanger in place and line it up with the marks you made earlier. Its a pretty tight fit, but if done right it shouldn't touch the a/c condenser
Fitment.jpg

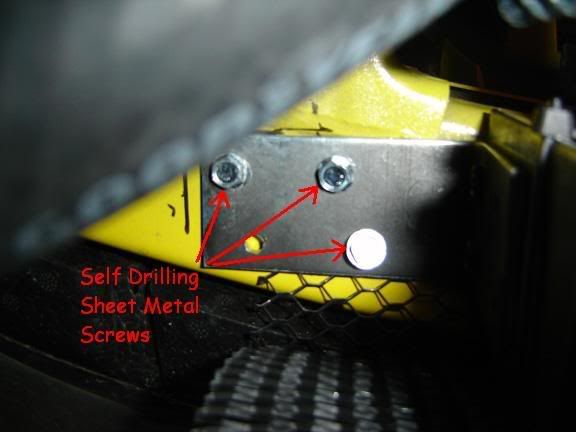
Now drill small pilot holes for the 6 self tapping screws. Then use an extension on the drill for sockets and drill in the screws
Mounting.jpg

Now secure the return line with zip-ties so that it doesn't hang lower than the front bumper, or touch the a/c condenser. Now your done, lower the car from the jack stands and go for a test drive!
Finishedproduct.jpg

I want to give a HUUUUUUGGGGGGGEEEEEEE thanks to George (Cobalt_Supercharged) for all the help and support! I owe you one!!!
 
Last edited:
Jn2

Full Access Member
Joined
Jul 19, 2009
Posts
1,847
Reaction score
1
i c a pulley and nothing else...i have the pulley and the black thing the pulley bolts too, u would just need to get the strut thing....

---------- Post added at 11:18 PM ---------- Previous post was at 11:17 PM ----------

CL05065.gif


the top part of #2...pretty much everything on #2 minus the actual strut
 

cobalt123

Platinum Member
Joined
Jul 18, 2009
Posts
15,200
Reaction score
4
Location
Tyler Texas
10ft. x ¾” I.D. Hose
10ft x ¼” I.D. Hose
4ft. x ½” I.D. Hose
1/4" is for option B if you have the stock HE or if your aftermarket one has a 1/4" bleeder nipple on it
no clue why he's getting 1/2" though.

I'm gonna be running a Cobra H/E and an extra coolant tank from Murray's...

I should only need the 3/4?

correct
 
Last edited:
Members online

Forum statistics

Threads
7,442
Posts
156,482
Members
4,387
Latest member
critty84

Latest posts

Top